Download the entire process in PDF format MIIS Deployment for Exchange 5.5
Introduction
There are situations where Exchange 5.5 will need to coexist with other directories for extended amounts of time. It is estimated that over 20 million Exchange 5.5 seats will remain in that environment for years to come. This is a troubling thought for Microsoft and indeed for those procrastinating companies since Exchange 5.5 support is over.
Having said that, the estimate remains and so does the problem of coexistence. In this example, we have an Exchange 5.5 organization that will need to stay synchronized with several other Active Directory environments running Exchange 2000 and Exchange 2003. To support this requirement, we need to ensure we have selected the fields and formats needed to allow message flow to work across different system types.
Objectives
The first thing we need to do is map out the directory requirements:
From the AD Domain to Exchange 5.5
a) Mail-enabled Contacts –> Exchange 5.5 custom recipients Name, Address, Company, title and Phone Number Fields SMTP, X.500 and X.400 addresses
b) Mailbox-enabled Users –> Exchange 5.5 custom recipients Name, Address, Company, title and Phone Number Fields SMTP, X.500 and X.400 addresses
c) Mail-enabled groups –> Exchange 5.5 custom recipients SMTP, X.500 and X.400 addresses
From Exchange 5.5 to the AD Domain
a) Exchange 5.5 custom recipients –> Mail-enabled Contacts Name, Address, Company, title and Phone Number Fields SMTP, X.500 and X.400 addresses
b) Exchange 5.5 custom recipients –> Mailbox-enabled Users Name, Address, Company, title and Phone Number Fields SMTP, X.500 and X.400 addresses
c) Exchange Distribution Lists –> Mail-enabled Contacts SMTP, X.500 and X.400 addresses Ownership and Support
While building the system, we found many more useful fields and attributes that should be added and we created intelligent discovery and join rules as well as highly detailed projection rules. This basic list you see above expanded to include hundreds of fields.
Product Choice
As you can imagine, there are many products available to perform this type of directory synchronization. HP offers a product called LDSU and less-expensive offerings such as SimpleSync are also available. We chose Microsoft’s Identity Integration Server 2003 because of its support for AD, Exchange and ability to synchronize with Lotus Notes, SQL and DBMS.
Test Lab Environment
The most important aspect of MIIS is your test environment. It is from this environment that you test new scripts, attribute flows, join rules, etc. For us, we have built an entire lab environment that includes MIIS, Exchange 5.5 and Exchange 2003 (on Windows 2000 Server) in virtual images that can be transported, copied and distributed to those who need a better understanding of the systems.
Servers and Configuration
There are three servers in this test environment. All are patched to the current date and homogenized with test data.
MIIS
The MIIS virtual machine has all the required components installed locally to fully manage and run the MIIS environment. SQL Server 2000 Enterprise, SP3 is installed and fully patched. Microsoft Identity Integration Server 2003, SP1 is also installed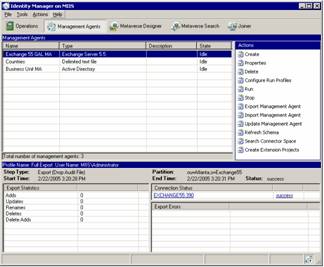 . In order to manage and maintain MIIS, Microsoft Visual Studio .NET 2003 is installed as well.
Computer name MIIS
- WorkGroup WorkGroup
- IP 10.10.20.233/24
- Administrator administrator
- Password MSEvent.123
Active Directory
On this image, we have Exchange Server 2003 as well as the domain services for the Alpineskihouse.com domain. Windows Server 2000 in installed as is the Support Tools (ADSIEdit is handy for this type of work)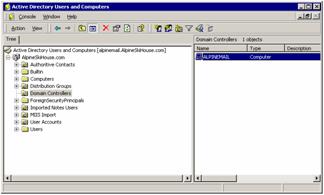
- Computer Name ALPINEMAIL
- Domain alpineskihouse.com
- IP 10.10.20.231/24
- Administrator administrator
- Password MSEvent.123
Exchange 5.5
The MIIS virtual machine is running Windows 2000 Server and Exchange 5.5. It is a domain controller as well as the global catalog server for EX5.com
- Computer name EXCHANGE55
- Domain EX5.COM

- IP 10.10.20.232/24
- Administrator administrator
- Password MSEvent.123
Setting up the MIIS Environment
Permissions
To help reduce the risk of applying changes back to the source systems, it is very important that each environment establish a working account for the MIIS system to use. In our examples, we have created an account in both domains called MIIS. These accounts should not be in the administrators or domain administrators group.
- MIIS Account name MIIS
- Password MSEvent.123
Active Directory
It is important that this account not be given too much access to the Active Directory.
- In the root of the Active Directory domain, give the MIIS account the following permissions:
- Read
- Replicating Directory Changes
- Replication Synchronization
- In the container or OU you wish to use to import metaverse data, give the MIIS account the following permissions:
- Full Control
- These rights could probably be tuned down finer in order to restrict group policy and some Exchange attributes, but this setting is the bare minimum for this container
Exchange Server 2003 (or 2000)
Some mail attributes require read permissions from the Exchange 2003 organization. It is a good idea to assign the same MIIS account the following permissions to the Exchange organization:
- Exchange View Only Administrator
Exchange 5.5
In order for MIIS to write to the Exchange directory, we repeat a similar process. As before, an account needs to be created. In our lab, we created a domain account named MIIS and made sure the account was not added to any administrative group. Then from the Exchange Admin application, give the account the following rights:
- Search Permissions to the Organization
- View Only Admin to the Site you will connect to for directory writes
- Admin to the container the MIIS server will use for directory writes
Note: In some cases, Search permissions will not work against the organizational such as when the DS Site Configuration for the site is incorrect or when the Anonymous account has been disabled or deleted. In these instances, it you may need to give the MIIS account greater access to the organization (this does not automatically give the account permissions to user objects as rights in the org-level are not inherited down to the site and container levels). The Admin role is sufficient in all cases to perform searches against the global address list. Verify that the account does not have permissions to the recipient’s container.
Management Agents
In the initial setup, there are two management agents. One MA connects to the Legacy Exchange 5.5 organization while the other connects to the product CRM Active Directory. As business break out of the Exchange 5.5 organization, they will need their own Management Agent added to initialize the connection and maintain directory Sync. These management agents control attribute flow, connection settings and are called (by name) from the custom provisioning code that has been written for this example. A third management agent has been added for country-code lookups, but it is not fully integrated and optional.
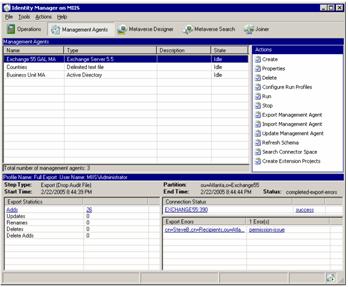
Management Window
The Identity Manager is where most of the work is done for MIIS. It is from this program that we configure the connections, attribute flow, replication schedule and monitor the system for errors and problems. It can be launched from the Start Menu and has several selections at the top of the screen. We will focus on the Management Agents screen for now.
Metaverse Object
Before we get into the management agents, we need to get a better understanding of what we are doing with MIIS and how we plan to do it! We will be importing Mailbox, DL and contact information from Exchange 5.5 and placing that information in a SQL database. This Metaverse will contain a global directory of names imported from Exchange 5.5 as well as names imported from other Active Directory domains. We have defined how these objects will look in the Metaverse by creating a generic MV object called a Metaverse_Contact.
This object type was created from scratch and contains specific fields needed for our immediate needs and some fields we think will be needed later for additional functionality.
Here are the attributes you need to add as well as the characteristics of the attribute:
Assistant String (indexable) Not Multi-valued
c String (indexable) Not Multi-valued
cn String (indexable) Not Multi-valued
co String (indexable) Not Multi-valued
company String (indexable) Not Multi-valued
department String (indexable) Not Multi-valued
displayName String (indexable) Not Multi-valued
division String (indexable) Not Multi-valued
employeeID String (indexable) Not Multi-valued
EmployeeStatus String (indexable) Not Multi-valued
employeeType String (indexable) Not Multi-valued
facsimileTelephoneNumber String (indexable) Not Multi-valued
givenName String (indexable) Not Multi-valued
groupType Number Not Multi-valued
hideDLMembership Boolean Not Multi-valued
homeMTA Reference (DN) Not Multi-valued
homePhone String (indexable) Not Multi-valued
info String (indexable) Not Multi-valued
initials String (indexable) Not Multi-valued
l String (indexable) Not Multi-valued
legacyExchangeDN String (indexable) Multi-valued Indexed
locality String (indexable) Not Multi-valued Indexed
mail String (indexable) Not Multi-valued Indexed
mailNickname String (indexable) Not Multi-valued
manager Reference (DN) Not Multi-valued
MapiRecipient Boolean Not Multi-valued
mobile String (indexable) Not Multi-valued
msExchAssistantName String (indexable) Not Multi-valued
msExchExpansionServerName String (non-indexable) Not Multi-valued
msExchHideFromAddressLists Boolean Not Multi-valued
msExchHomeServerName String (indexable) Not Multi-valued
msExchMasterAccountSid Binary (indexable) Not Multi-valued
msExchOriginatingForest String (indexable) Not Multi-valued
nTGroupMembers Binary (indexable) Multi-valued Indexed
o String (indexable) Not Multi-valued
otherHomePhone String (indexable) Multi-valued Indexed
otherTelephone String (indexable) Multi-valued Indexed
pager String (indexable) Not Multi-valued
physicalDeliveryOfficeName String (indexable) Not Multi-valued
postalCode String (indexable) Not Multi-valued
proxyAddresses String (indexable) Multi-valued Indexed
Rfc822Mailbox String (indexable) Not Multi-valued
sn String (indexable) Not Multi-valued
st String (indexable) Not Multi-valued
streetaddress String (indexable) Not Multi-valued
targetAddress String (indexable) Not Multi-valued Indexed
telephoneAssistant String (indexable) Not Multi-valued
telephoneNumber String (indexable) Not Multi-valued
textEncodedORAddress String (indexable) Not Multi-valued
title String (indexable) Not Multi-valued
uid String (non-indexable) Not Multi-valued
It is possible to clean up these entries in order to further trim down unnecessary attributes. In some instances, you may want to create additional attributes for specific tasks for example. You could create an attribute to denote whether an item should be written to the target directory and perform a filter against that field. In addition, you could create “work” fields to hold any type of data you wish to key upon in code.
Exchange 55 GAL MA
OK, so now that we know the Metaverse (MV) object we are going to target, we can take a deeper look at the agents that collect and distribute the data. Each MA contains connection information to a specific directory. As a result, each MA is also known as a Collector Space (CS). To view the settings on the Exchange 55 GAL MA, we need only to double click the agent from the m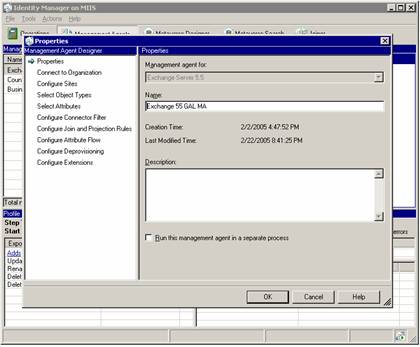 ain agent screen.
This page shows us the base Management Agent (Exchange Server 5.5) and the name we have provided to identify the Agent. This name is used within the source code to identify the Connector Space.
Connection to Organization
In this page, we identify the Exchange 5.5 server we will connect to as well as the credentials we will use. You can see that we have specified the MIIS user account in order to restrict our permissions to the Exchange environment. Moreover, you should notice that we are not using the standard port of 389 for our LDAP connections. This server is also a Windows 2000 Server running Domain Controller services so we had to change the Exchange 5.5 port for LDAP to port 390.
Configure Sites
It is from this screen that we identify the sites that contain the objects we want to 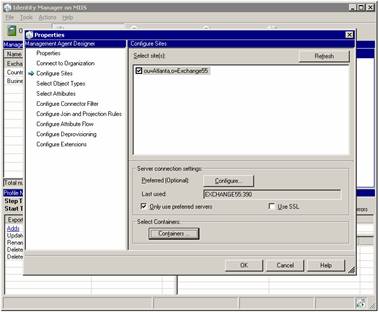 synchronize (copy to) with the AD. From this screen, we can identify any other servers we want to target (not required for this installation) as well as the containers we want to choose.
Note: It is important that you select both the source containers and target containers from the Containers window. Deselected containers will not be used for either reading or writing with MIIS.
Select Object Types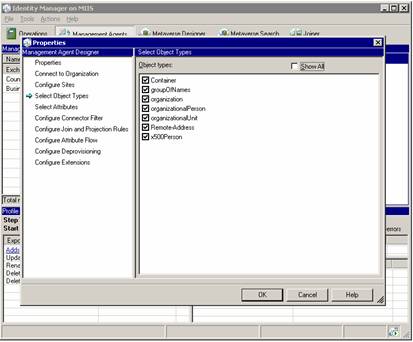
We need to expose several different types of information from the Exchange 5.5 environment. You will probably need to use the Show All checkbox to select each of these object types.
Select Attributes
In our case, we are selecting a few more attributes than required per our list of requirements, but the additional fields we have identified will allow us to better connect the directories now and for later projects.
You will certainly need to select the Show All checkbox to get to all of these attributes:
- C
- Cn

- Co
- Company
- Department
- Description
- Extension-Attribute-1
- facsimileTelephoneNumber
- giveName
- Hide-From-Address-Book
- Initials
- L
- Mail
- MAPI-Recipient
- Mobile
- otherMailbox
- pager
- physicalDeliveryOfficeName
- postalAddress
- postalCode
- Proxy-Addresses
- Rdn
- Report-To-Originator
- Report-To-Owner
- Rfc822Mailbox
- Sn
- St
- Street
- Target-Address
- telephoneNumber
- textEncodedORaddress
- title
- uid
Configure Connector Filter
The connector filter is used to specify things we do not want to replicate. In our environment, we have chosen not to replicate anything that does not have an Internet Address. We could also choose not to replicate hidden objects or objects with certain key words in the Custom Attribute field or similar. The object types you see listed in this window are specific to Exchange 5.5.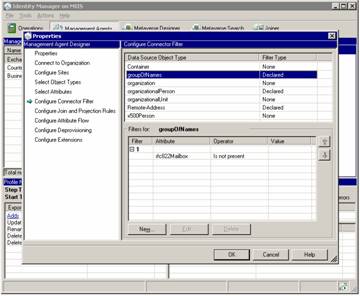
groupOfNames –distribution list
organizationalPerson -mailbox
Remote-Address –custom recipient
These are the only objects you really need to focus on when building filters in this Exchange management agent.
Configure Join and Projection Rules
This is where things can get a little confusing with MIIS. It is important that each person in your organization only exist in the directories once. This sounds pretty basic, but if there are more than one of you, then mail flow could break. The problem is that in many cases, a company has a contact or custom recipient in one system that “points” to a mailbox in another system. Because of that, you may be in two directories at once. Now, if we should try to combine those directories, we need to make sure there is some logic that does not allow duplicate entries to be created.
Join Rules
The purpose of a join rules is to try to match objects before creating them. For example, let us assume that someone in one directory has created n custom contact or recipient for someone in another directory. By default, both would be copied to the metaverse.
This part in of itself does not create a problem. It is when that objects are written back that we have issues as duplicate items will be written which will certainly cause a disruption in mail flow within that system.
To prevent this from happening, we use join rules to “connect” duplicates in the metaverse.
You can create very specific join rules to follow your business logic For example, you may have items in an HR system that should take precedent over other source systems in which case you could join based on a specific field type or format.
In this example, we are joining objects if the mail attribute is matched. In other words, if an object using the mail attribute: mkirves@businessa.com is in the metaverse, another object using the same mail attribute will “join” the existing one. This prevents the mail address from being used more than once in the environment. In fact, we are using two rules for each object type:
- Join if mail attribute is matched
- If a contact, group or user is imported into the metaverse with a specific mail attribute, no other other object may overwrite it. This means that user objects may “join” existing contact objects if the custom recipient already exists for that user. The drawback to this example would be that the entry could have incomplete directory information and that the real mailbox would not be authorative for the object.
- Project is mail attribute is not matched
- If the RFC822mailbox field is populated and the there is no match for the mail attribute, then the object will be automatically projected into the Metaverse
Configuring the basic join rules I have described is a fairly easy task and should take no longer than a few short minutes to apply. Open the Configure Join and Projection Rules selection from the Exchange 55 GAL MA agent.
You will need to add two rules to each of the object types you wish to synchronize. For this example, we will add the following:
groupOfNames
- Declared Projection Rule based on the Metaverse_Contact object type.
- Direct Join rule based on the mail field between the “mail” data source attribute and the “mail” attribute on “Metaverse_Contact.
organizationalPerson
- Declared Projection Rule based on the Metaverse_Contact object type.
- Direct Join rule based on the mail field between the “mail” data source attribute and the “mail” attribute on “Metaverse_Contact.
Remote-Address
- Declared Projection Rule based on the Metaverse_Contact object type.
- Direct Join rule based on the mail field between the “mail” data source attribute and the “mail” attribute on “Metaverse_Contact.
You should notice that the projection rules follow the join rules. You can create multiple join rules for each object type and you can specify custom rules to handle joins. For our purposes, the standard mail mapping fields will suffice.
Configure Attribute Flow
This step will likely take the most time and you should pay close attention to the detail. As we map fields from Exchange to the metaverse and visa-versa we have to pay close attention to the flow direction as well as any advanced rules we need to apply. As you will find out, standard mapping rules will allow us to meet our objectives. From the Configure Attribute Flow screen, you can see that we are configuring flow for all three object types we wish to synchronize.

To make things simple for this installation, we are importing each of the Exchange settings into a single object type called Metaverse_contact. Moreover, we are only exporting objects into the Exchange environment as Remote-Address (custom recipients) and only into a specific, pre-determined container. When specifying attribute flow, you choose the source, the target and the fields you wish to map. In addition, you can specify any advanced mapping type you wish to use. When using the advanced features, we can select more than one object type as a source and the source code we wish to use to handle the business logic. Let’s go over an example. You should notice that the mail field highlighted in the picture shows an Advanced mapping rule is in place. If we click Edit, we can see which rule is being identified.
From the advanced flow options window, we can see that a specific flow rule named “mail” is identified. This tells MIIS that when performing an import on this object, it should reference the extension DLL identified in this MA (we will get to that later in the document) and that the logic in that code should be applied to this flow.
Inside our extension DLL, we have a sub called:
Public Sub MapAttributesForImport(ByVal FlowRuleName As String, ByVal csentry AsMicrosoft.MetadirectoryServices.CSEntry, ByVal mventry AsMicrosoft.MetadirectoryServices.MVEntry) ImplementsMicrosoft.MetadirectoryServices.IMASynchronization.MapAttributesForImport
Within this sub, there are several import rules defined. This is the one named mail:
Case "mail"

                If csentry(FlowRuleName).IsPresent Then

                    Dim work As String = csentry(FlowRuleName).Value

                    work = Replace(work, "/", "")

                    work = Replace(work, "\", "")

                    mventry(FlowRuleName).Value = work

                End If
The purpose of this code is to cleanout illegal characters such as the “/” and “\” from the mail address (SMTP Address). An illegal address of Atlanta/sales@companya.comwould be changed to atlantasales@companya.com. While the illegal characters would remain in the Exchange system, they would be clean in the metaverse and then legal to push to AD.
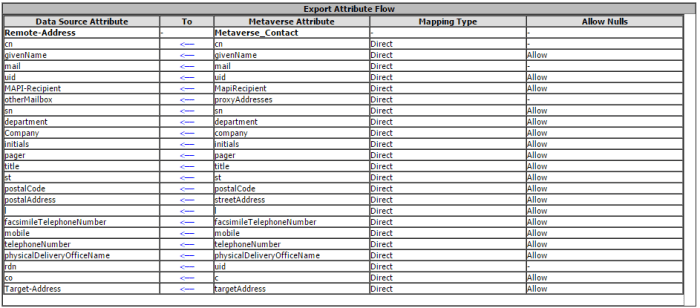
Export Attribute Flow (Send to Exchange from Metaverse)
Here are the current flow settings for the Exchange MA. You can see from this table, that we did not require specialized code to manipulate the data. Instead, we elected to clean the information during the import process so that data in the metaverse is “normalized”.
Import Attribute Flow (Send to Metaverse from Exchange)
Importing Exchange information into the metaverse required much more work in that we needed to reformat, clean and construct new fields based on information collected from other fields. In order to correctly populate the proxyaddresses attribute, we had to contruct the field based on three Exchange 5.5 fields; otherMailbox, rfc822Mailbox and textEncodedORaddress. Custom code was created to combine these strings into a collection in order to populate the multi-value field in the MV. To see the source code for the specific rules extensions, refer to the code section at the end of this document.


 One thing we have learned with this model is we do not have to change the migration scripts to target different DCs and servers and most importantly we know exactly what our migration capacity is and can hit our projected numbers every single time with no surprises. As I mentioned before, it is also important that the target Exchange servers have only one storage group and one mail store. This will eliminate a potential problem with mailboxes that may “split” across stores.
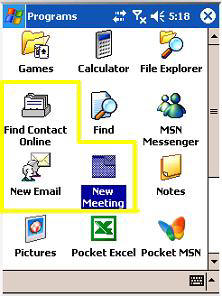
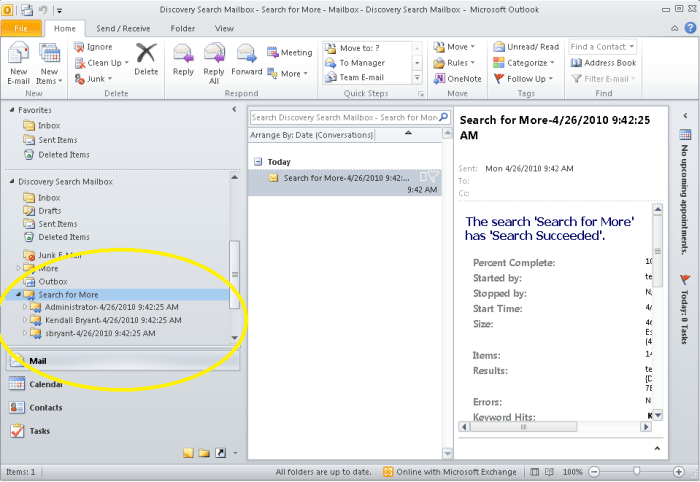
 New Meeting fires up a meeting request pane. If you know the SMTP address of the attendees you wish to invite then you need only to key their addresses into the Attendees box. Remember to separate the names with a semi-colon.
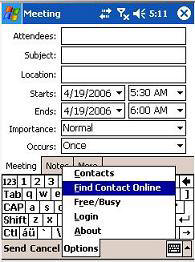
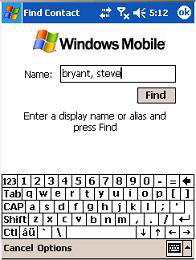 Key in the name of the person you wish to find and click Find to begin the launch. After the lookup is complete, you should see the results. Scroll down to choose the correct contact and click Done when you found the right one.
 Now things start to get really interesting. Now that you have selected all the attendees, the meeting time, subject line, notes, etc you can check the group’s free-busy data. (Yeah, you heard me right)
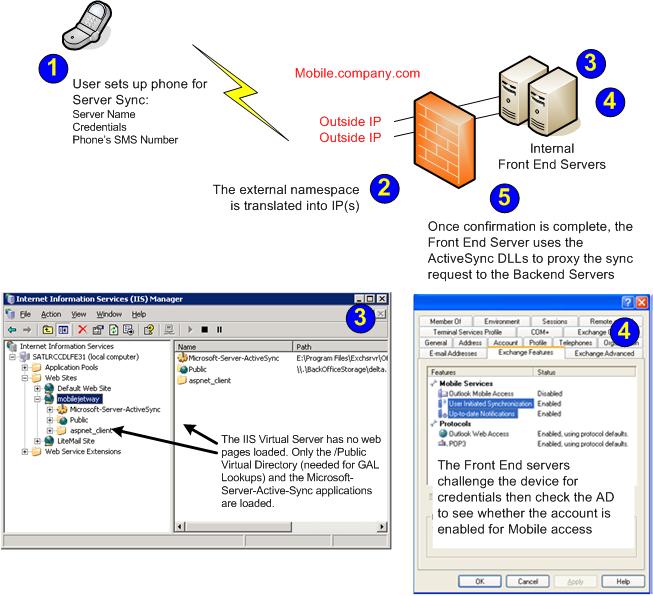
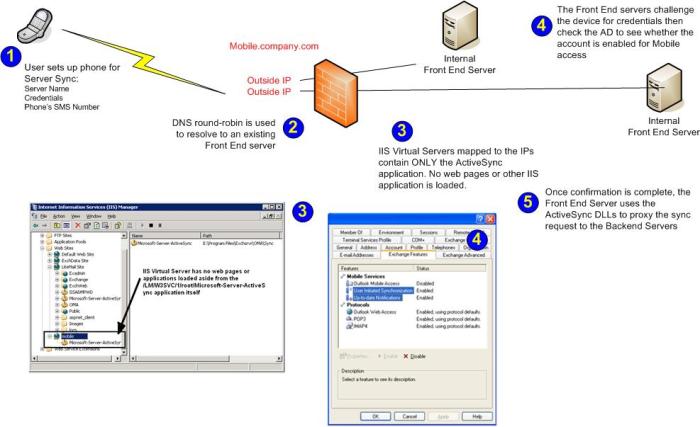 What you have with this design is the minimum footprint required to support ActiveSync synchronization over the wire. Unfortunately, this configuration is so locked-down; it will not allow the Find Contact features to work! Here is why: