I know the security folks are going to tear into me for this, partly because I use the word Secure, and partly because it is not truly secure. Let me share with you some ideas on how you can install Exchange 2000 and AD and let your users connect from the Internet with their MAPI client as well as OWA.
I know the security folks are going to tear into me for this, partly because I use the word Secure, and partly because it is not truly secure. Also, this is not an article for my larger Exchange customers. If you have more than a couple of hundred people, this solution will probably be meaningless to you. Having said that let me share with you some ideas on how you can install Exchange 2000 and AD and let your users connect from the Internet with their MAPI client as well as OWA.
First, I want to talk about MAPI for a minute. As much as I fought against the inclusion of MAPI in newer releases of Exchange, I am beginning to like MAPI more and more these days. For one, it is rich in features: Offline access, delegation, additional address books and especially the rules and ability to drag and drop items from the desktop are all valid reasons to keep using the protocol. Another feature is security. Have you ever looked at an MAPI or RPC packet with a protocol analyzer? There is not much to look at and you have to be very clever in order to reassemble the packets and try to piece something together. Even clever sneaks would rather wait for un-encrypted HTML traffic to open and read. HTML traffic is far more interesting anyway; what you are buying, what you are researching, etc.
So here is the problem; MAPI access uses dynamic TCP ports. Moreover, directory access and additional components of Exchange and AD will assign dynamic ports.
Configure the Network Sharing Device/Firewall
First, buy yourself a network sharing device like the Linksys Cable/DSL sharing switch. I have used this one and prefer it since you can specify any internal IP range. The Belkin and some others require a 192.168.x.x internal addressing. This is not a critical issue, just a preference of mine. The most important thing to remember is that you will need at least one static IP address from your DSL provider in order to provide consistent access to the users and to allow internal SMTP traffic to reach your server. Configure this static IP address on your network sharing device and configure the internet port as well. I prefer a 10.10.10.x to use internally, but the device you purchase may dictate a different IP structure.
Configure the Server
Install Windows 2000 Server with SP2. Also, install Terminal Server, DNS Server, DHCP Server and SMTP, NNTP (from the IIS settings). You only need one network card on the server and assign an internal IP address for the server. I like to use 10.10.10.2-10 for my servers at home. Set the DNS settings on the network interface to point to the local server. In other words, if your server is 10.10.10.2, set the DNS and WINS settings to 10.10.10.2. After things are running, open the DNS Server settings and set your DNS server to forward to the DNS servers provided by your Internet Service Provider. After you have all the settings in place, test connectivity to the Internet. Once you have the server running and connected to the Internet (for browsing), connect to http://windowsupdate.microsoft.com and download the latest updates.
Run DC Promo and configure the domain with a DNS name that is different than the actual domain you will use. For example, if you are company.com, create the AD and DNS for company.net. Make the NetBIOS name of the domain the name of the company, such as ProExchange. Rename the administrator account to something else and change the password. Make sure the guest account is disabled. Create an account named Exchange and give it domain and enterprise permissions. Now, use the DNS Admin settings to manually create a standard DNS zone for the true domain for your company. This is what will be used for the outside world. Add a www entry, an entry named email and an MX record with a cost of 10 to email.company.com (or whatever the name). These entries should all point to the static IP address you assigned the Network Sharing Device. (The IP address your ISP assigned to you.)
Configure Exchange 2000
Install Exchange 2000 on the same server. Change the recipient policy so that the SMTP names are generated for the true company domain and not the fake one we identified. Also, add a formula in the name generation as follows: %m@company.com. This will use the NT name for the email address.
You will probably need to add a new SMTP address and make the modifications, then delete the old company.net in order to have just the one.
Here is an example of how it could look on the server:
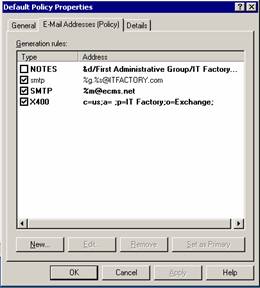
%g.%s@company.com will give you firstname.lastname. Here are some other options.
%g = given name (first name)
%i = middle initial
%d = display name
%m = Exchange 2000 Alias
%rxy = Replace all subsequent characters x
%1s = Uses the first letter of the surname
%5g = Uses the first five letters of the given name
Modify the server for MAPI access through a firewall
Next, we need to tell the server to use static ports instead of dynamic ones for MAPI and RPC access to the server. This will affect all MAPI and RPC access to the server, but in a small environment of less than say 100 people, the settings should be fine. If you have somewhere closer to 200-500 people, you will need to increase the RPC ports. In our example, we are using 51 ports which works fine for a company at or around 200 people.
Be careful with the registry; make sure you are performing this on a new server (one you can reinstall the OS if needed). Locate and select the following key in the registry:
HKEY_LOCAL_MACHINE\SYSTEM\CurrentControlSet\Services\NTDS\Parameters
On the Edit menu, click Add Value , and then add the following registry value:
Value name: TCP/IP Port
Data type: REG_DWORD
Value data: 1025 (in decimal)
System\CurrentControlSet\Services\MSExchangeIS\ParametersSystem
Add the following entry:
Value name: TCP/IP Port
Data type: REG_DWORD
Value Data: 1026 (in decimal)
System\CurrentControlSet\Services\MSExchangeSA\Parameters
Add the following entry:
Value name: TCP/IP Port
Data type: REG_DWORD
Value Data: 1027 (in decimal)
System\CurrentControlSet\Services\MSExchangeSA\Parameters
Add the following entry:
Value name: TCP/IP NSPI Port
Data type: REG_DWORD
Value Data: 1028 (in decimal)
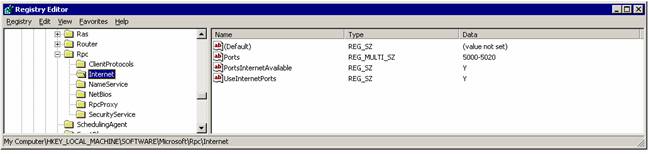
If you want to enable other RPC programs to work through a firewall, you can establish a set of ports for RPC. This makes other things work well too such as some administrative programs:
Work on the firewall
Now we have to break this “secure” network by opening up ports for access. In this case, I have added some comments about DNS and HTTP. You are encouraged to place your DNS zone and HTTP files at in ISP/ASP. For OWA access, I would only open 443 and have your uses connect to email using https://owa.company.com/exchange (Assuming you have put SSL on the server). Configure the firewall to let certain ports pass-through to the server.
SMTP 25
HTTP 80 Discouraged. Put your web files somewhere else.
HTTPS 443
MAPI 1025-1028
RPC 5000-5020
DNS 53 Discouraged put your DNS somewhere else
RPC Listening Ports 135 and 139
Terminal Server 3389
Add these too: 88, 110, 143, 189, 445, 636, 993, 995, 3268, 3269
Those ports are for IMAP, POP, VPN, etc. For more specific ports descriptions, see articles Q289241 for Windows 2000 Ports and Q278339 for Exchange 2000 ports.
Network Diagram
Client access
Internally, create a DHCP scope on the server that uses the internal 10.10.10.x addressing (or whatever you used for to internal port on the firewall and the server), the IP address of the server for WINS and DNS and the internal interface on the router for the gateway. Make sure WINS and DNS is working on the server and verify that the clients can ping the NetBIOS name of the server from the command prompt. Install Outlook on your internal machines and test connectivity to the server.
Externally, the configuration is the same, except for the need for a host file to resolve the NetBIOS name. I tend to use the hosts. File for this purpose. In that file, add the IP address your ISP provided you and the NetBIOS name of the server. For example:
85.45.2.97 exchange1
Once configured correctly, the clients should be able to connect to the server using Outlook.
If you experience problems with the connection, refer to articles Q298369 for Global Catalog Server configurations and Q270836 for Exchange 2000 Static Port Mappings.
Because of the additional ports identified above for the firewall, your clients should also be able to connect using HTTPS and IMAP and POP. Moreover, SMTP is open so inbound Internet mail should route. Because we opened 53, your server could be used for DNS queries as well. If those ports are not required, close them!
Summary
With an inexpensive firewall device, you can allow client access to your Exchange server from the Internet. In fact, the single server could act as domain controller, DNS server, web server as well as email and application server. Is it smart to put everything into one box? No, but if you start with this simple design, you can work towards a more secure environment. In some cases, an inexpensive temporary solution may provide access until your Microsoft ISA server or more sophisticated Firewall solution can be allocated.
It is possible to use this configuration in a larger scale to connect locations. That will be another story.

 xample. Launch the Designer, and verify the server name, then type public/ in the folder box and click the browse button to view the folders.
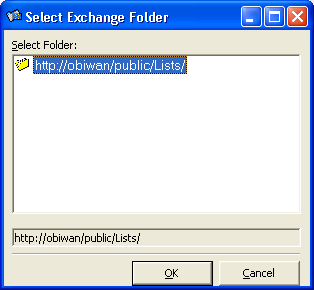
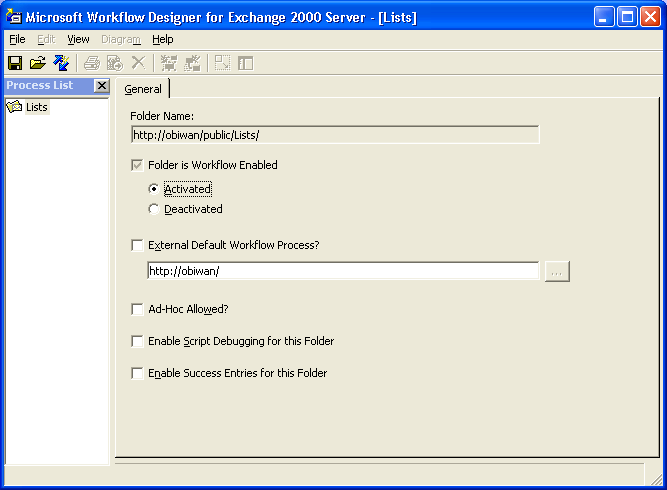 . Lastly, set the workflow as the default for the folder by selecting the General tab of the workflow process itself from within the Designer program.
 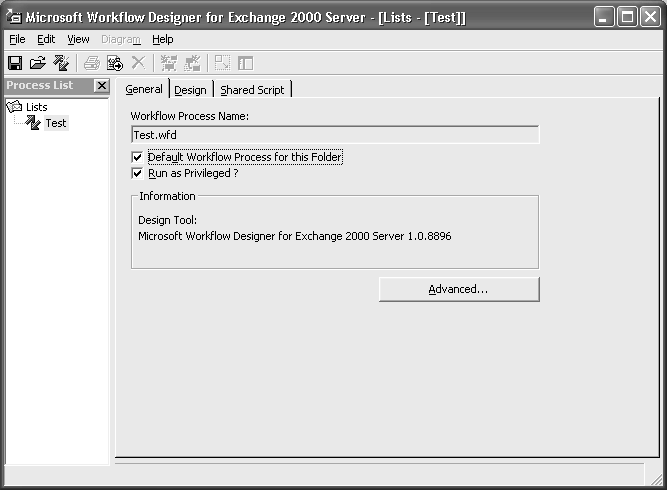 Save the settings and launch the Active Directory Users and Computers to add some sample groups you can use to test. For my tests, I created a couple of sample groups named Lista and listb. To test, I email a message to the public folder with the words subscribe lista then another with subscribe listb. Experiment with unsubscribe as well. Now remember there is a limit of accounts that can be contained in a single distribution group in the Active Directory.